Hp Envy 100 D410 Continuously Jams
Z7_3054ICK0KGTE30AQO5O3KA30N0
hp-concentra-wrapper-portlet
![]() Actions
Actions
A 'Paper Jam' Error Displays on the HP ENVY 100 and ENVY 110 e-All-in-One Printer Series
Issue
The product does not print or stops feeding pages when printing. A 'Paper Jam' message displays on the product control panel.
note:Paper jams can be real or false. The product might report a paper jam even when there is no jammed paper. The following steps apply to both real and false paper jams.
 IMPORTANT: You must follow these solutions in the order presented to resolve the issue.
Video of clearing a paper jam
The following video demonstrates how to clear a paper jam.
note:This video shows an HP ENVY 100 (D410a) printer, but the steps are the same for your printer.

Solution one: Turn the All-in-One off and on again
Follow these steps to turn the product off and then on again.
Step one: Turn the All-in-One off and on again
-
Press the Power button (
 ) to turn off the product. If the product does not turn off, continue to the next solution.
 -
Wait 60 seconds.
-
Press the Power button (
) to turn the product on.note:
The product might go through a warm-up period which might last up to two minutes. The product lights might flash and the carriage might move. Wait until the warm-up period completes before you continue.
Step two: Print a self-test report
Printing a self-test report verifies if the hardware functions correctly.
-
Load plain white paper in the input tray.
-
From the home screen on the product control panel, touch Setup (
 ), and then touch Tools. The Tools menu displays.
 -
On the Tools menu, touch Printer Status Report. The product prints the report.
-
If these steps resolved the issue, and the test page prints, there is no need to continue troubleshooting.
-
If the issue persists, continue with the next solution.
-
If the test page does not print, continue with the next solution.
Solution two: Clear the jam from the All-in-One
Follow these steps to first clear the paper jam from the back of the product, and then clear the jam from the front if necessary.
caution:Clearing a paper jam from the front of the product can damage the print mechanism. Gain access to and clear paper jams through the back of the product whenever possible.
Step one: Remove any loose paper
Remove any paper from the input tray.
Step two: Clear the paper jam from the input/output area inside the All-in-One
Use the following steps to check for and remove jammed paper from the input/output area inside of the product.
-
Press the Power button (
) to turn off the product. -
Turn the product around to access the back of the product.
-
Disconnect the power cord from the back of the product.
-
Disconnect the USB cable from the back of the product.
-
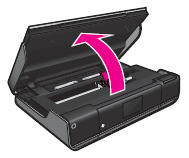
Open the access door.
Figure : Open the access door
-
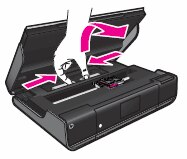
Carefully pull the paper up and out to remove it from the product.
Figure : Remove paper from the input/output area

note:
If the paper tears when you remove it, check for torn pieces of paper that might remain inside the product. If pieces of paper remain in the product, more paper jams might occur.
-
Close the access door.
Figure : Close the access door

Step three: Clear the paper jam from the paper path inside the All-in-One
Use the following steps to clear jammed paper from the paper path.
-
If the product is not turned off, press the Power button (
) to turn it off. -
Disconnect the power cord from the back of the product, if it is not already disconnected.
-
Open the access door.
Figure : Open the access door
-
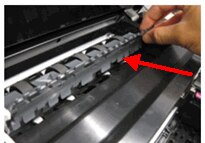
Press inward on the two tabs on the paper path cover, and then lift the cover to remove it.
Figure : Remove the paper path cover
-
Gently remove any paper from the paper path.
note:
If the paper tears when you remove it, check for torn pieces of paper that might remain inside the product. If pieces of paper remain in the product, more paper jams might occur.
-
Reattach the paper path cover. Press inward on the two tabs on the paper path cover, and then insert the cover back into the product and press down until the cover fits securely in place.
-
Close the access door.
Figure : Close the access door
Step four: Clear the jam from the internal duplexer paper path
Use the following steps to clear jammed paper from the duplexer paper path.
-
If the product is not turned off, press the Power button (
) to turn it off. -
Disconnect the power cord from the back of the product, if it is not already disconnected.
-
Open the access door.
Figure : Open the access door
-
Press inward on the two tabs on the paper path cover, and then lift the cover to remove it.
Figure : Remove the paper path cover
-
Lift the plastic duplexer flap to access the duplexer paper path.
Figure : Lift the plastic duplexer flap
-
Gently remove any paper from the duplexer paper path, and then lower the plastic duplexer flap.
note:
If the paper tears when you remove it, check for torn pieces of paper that might remain inside the product. If pieces of paper remain in the product, more paper jams might occur.
-
Reattach the paper path cover. Press inward on the two tabs on the paper path cover, and then insert the cover back into the product and press down until the cover fits securely in place.
-
Close the access door.
Figure : Close the access door
-
Reconnect the power cord to the back of the product.
-
Press the Power button (
) to turn on the product.
Step five: Print a self-test report
Printing a self-test report verifies if the hardware functions correctly.
How to print a self-test report
-
Load plain white paper in the input tray.
-
From the home screen on the product control panel, touch Setup (
), and then touch Tools. The Tools menu displays. -
On the Tools menu, touch Printer Status Report. The product prints the report.
-
If these steps resolved the issue, and the self-test report prints, there is no need to continue troubleshooting. Reconnect the USB cable, and then try to print again.
-
If the issue persists, continue with the next solution.
-
If the self-test report does not print, continue with the next solution.
Solution three: Make sure that the carriage can move freely
Use the following steps to make sure that the carriage moves freely.
Step one: Check the carriage path
-
If the product is not turned on, press the Power button (
) to turn it on. -
Open the access door. The carriage might try to move to the center of the product. If it does, allow it to move to that position.
Figure : Open the access door
-
With the product turned on, disconnect the power cord from the back of the product.
-
Unplug the power cord from the power source or electrical outlet.
warning:
You must unplug the power cord to move the carriage by hand and reset the paper feed mechanism without the risk of electrical shock.
-
Check for any paper or objects that might be restricting the carriage, and then remove any paper or objects that you find.
note:
If the paper tears when you remove it, check for torn pieces of paper that might remain inside the product. If pieces of paper remain in the product, more paper jams might occur.
-
Reach inside the product through the access door, and then manually move the carriage.
-
If the carriage is stuck on the right side, move the carriage to the left side of the product.
-
If the carriage is stuck on the left side, move the carriage to the right side of the product.
-
If the carriage is stuck in the middle, move the carriage to the right.
-
-
Make sure that the carriage can move freely across the width of the product by gently pushing the carriage to the left, and then to the right.
-
Close the access door.
Figure : Close the access door
-
Reconnect the power cord to the back of the product.
-
Press the Power button (
) to turn on the product
Step two: Print a self-test report
Printing a self-test report verifies if the hardware functions correctly.
How to print a self-test report
-
Load plain white paper in the input tray.
-
From the home screen on the product control panel, touch Setup (
), and then touch Tools. The Tools menu displays. -
On the Tools menu, touch Printer Status Report. The product prints the report.
-
If these steps resolved the issue, and the self-test report prints, there is no need to continue troubleshooting. Reconnect the USB cable, and then try to print again.
-
If the issue persists, continue with the next solution.
-
If the self-test report does not print, continue with the next solution.
Solution four: Clean the rollers
Dust, paper fiber, and other debris might accumulate on the paper feed rollers and cause paper jams and paper feed issues. Follow these steps to clean the paper feed rollers.
Step one: Clean the rollers
-
Gather the following materials:
-
A clean, lint-free cloth, or any cloth that will not come apart or leave fibers
-
Distilled, filtered, or bottled water (tap water might damage the product)
-
-
Press the Power button (
) to turn off the product. -
Disconnect the power cord from the back of the product.
-
Open the access door.
Figure : Open the access door
-
Press inward on the two tabs on the paper path cover, and then lift the cover to access the paper rollers.
Figure : Remove the paper path cover

-
Lightly dampen a clean, lint-free cloth with bottled or distilled water, and then squeeze any excess liquid from the cloth.
-
Lift the plastic guard that is attached to the rollers to gain better access to the rollers.
Figure : Lift the plastic guard that is attached to the rollers

-
Press the cloth against the rollers and rotate them forward with your fingers. Apply a moderate amount of pressure to remove any dust or dirt buildup.
-
Allow the rollers to dry for 10 or 15 minutes.
-
Reattach the paper path cover. Press inward on the tabs on the paper path cover, and then carefully fit the cover back inside the product. Once the cover fits into place, release the tabs.
note:
Make sure the paper path cover fits securely, otherwise the product will not function correctly.
-
Close the access door.
Figure : Close the access door
-
Reconnect the power cord to the back of the product.
-
If the product does not turn on automatically, press the Power button (
) to turn it on.
Step two: Print a self-test report
Printing a self-test report verifies if the hardware functions correctly.
How to print a self-test report
-
Load plain white paper in the input tray.
-
From the home screen on the product control panel, touch Setup (
), and then touch Tools. The Tools menu displays. -
On the Tools menu, touch Printer Status Report. The product prints the report.
-
If these steps resolved the issue, and the self-test report prints, there is no need to continue troubleshooting. Reconnect the USB cable, and then try to print again.
-
If the issue persists, continue with the next solution.
-
If the self-test report does not print, continue with the next solution.
Solution five: Reset the product
Sometimes a paper jam error persists even though there is no jammed paper (false paper jam). Follow these steps to perform a power reset, which will clear a false paper jam error.
Step one: Perform a power reset
-
With the printer turned on, disconnect the power cord from the rear of the printer.
-
Unplug the power cord from the wall outlet.
-
Wait at least 15 seconds.
-
Plug the power cord back into the wall outlet.
-
Reconnect the power cord to the printer.
-
Turn the printer on.
Step two: Print a self-test report
Printing a self-test report verifies if the hardware functions correctly.
How to print a self-test report
-
Load plain white paper in the input tray.
-
From the home screen on the product control panel, touch Setup (
), and then touch Tools. The Tools menu displays. -
On the Tools menu, touch Printer Status Report. The product prints the report.
-
If these steps resolved the issue, and the test page prints, there is no need to continue troubleshooting. Reconnect the USB cable, and then try to print again.
-
If the test page prints successfully, but you continue to experience an issue with your printer, then the issue is not related to the hardware.
-
If the printer does not print a test page, there is an issue with the printer hardware. Continue to the next step or solution.
Source: https://support.hp.com/si-en/document/c02446047
0 Response to "Hp Envy 100 D410 Continuously Jams"
Post a Comment